
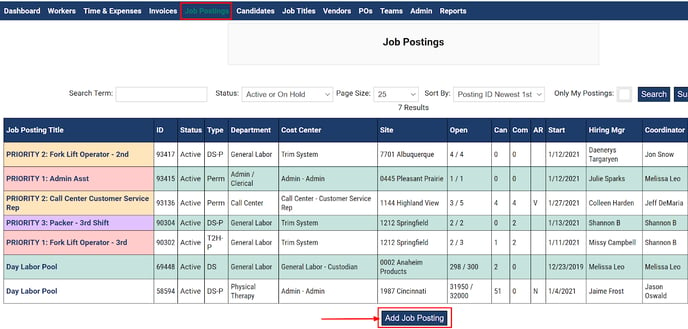
From the 'Job Postings' tab select 'Add Job Posting' found at the bottom of the page.
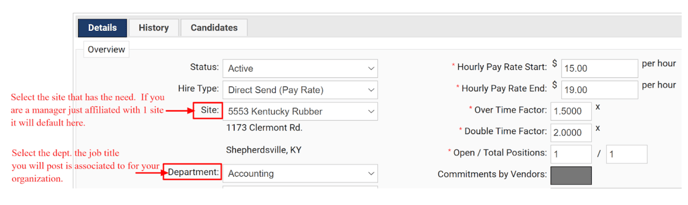
The job posting page functions top down, you will want to select your site and department first.
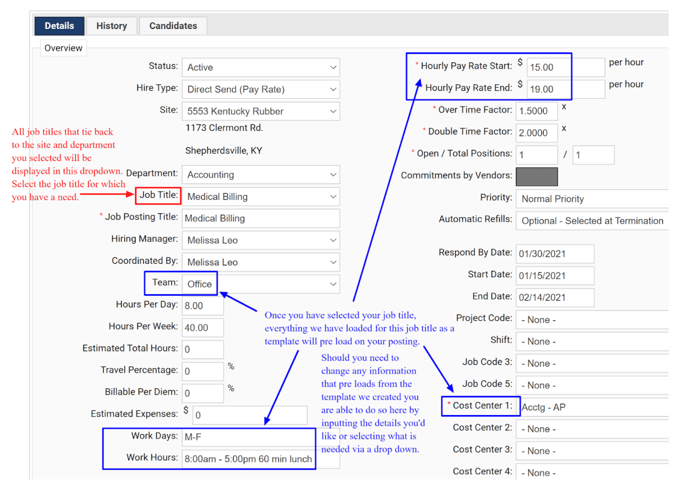
As part of our implementation, SimpleVMS will upload the job titles your organization commonly uses for contingent labor. These job title templates make the creation of your job postings very easy as the data for your job title will pull over via the template we have created. Any information pulled over from the template onto the job posting can be updated at time of posting, if needed.
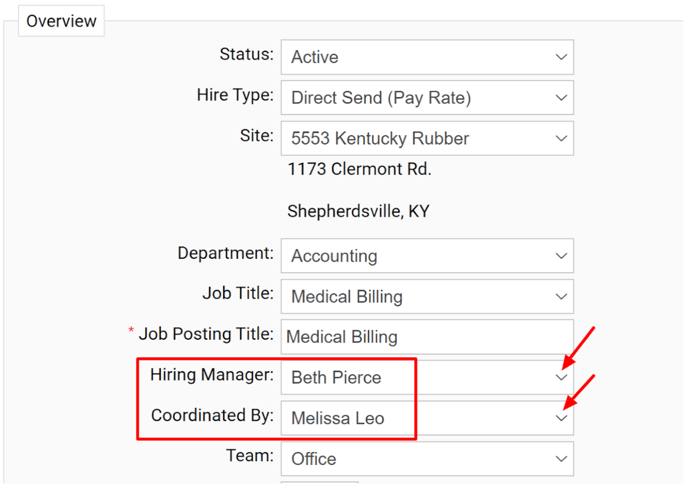
Whoever is logged into the system creating the posting will be listed as both the 'Hiring Manager' and 'Coordinated By' manager. If you are posting this position on behalf of someone else on your team you will simply just select the drop down to choose the appropriate person on your team in these fields.
-
Hiring Manager: This is the manager the associate(s) will report while on assignment.
-
Coordinated By: The coordinating manager is someone that will also get alerts on the job posting. Generally, a coordinating manager, is someone in HR that is perhaps posting the position on behalf of a hiring manager. A posting does not have to have a different coordinating manger from the hiring manager, these can be the same person.
Enter in the number of 'Open' and 'Total Positions' for your posting. These 2 numbers indicate the number of open positions and the number of total positions requested. The number to the right, total positions, is the total number of positions that were opened and the number to the left, open, is the number of positions that still need to be filled. When creating a job posting these numbers should be the same.
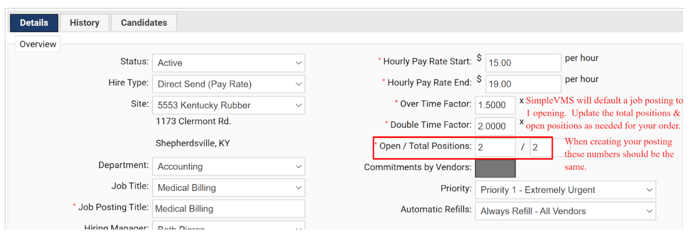
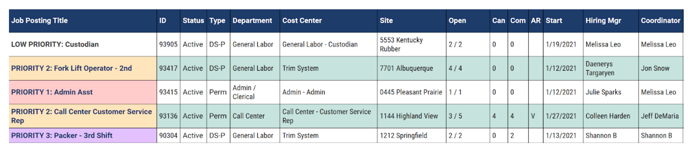
Select your 'Priority' level for this posting. The system will default to a normal priority, if this posting is of an urgent need you can change the priority level of the posting. This will display the posting in a different color with the words 'Priority 1, 2, or 3' respectively or 'Low Priority' in front of the job title for both you and your vendors. Your vendors will know to work on this order above any others for you as you have a need for it more expediently.
To set your priority on the job posting, select which priority level is needed from the drop down menu.

There are 5 priority levels to select from in SimpleVMS, when priority levels 1-3 are selected the job posting title will be highlighted in that priority levels color.
Please use priority levels for postings as intended. Should all of your job postings be a priority level 1-3 then it loses it's meaning to your vendor(s) when they see this on an order.
Priority 1 - Extremely Urgent (Red): This is the highest priority level.
Priority 2 - Very High (Orange): Second highest priority level.
Priority 3 - High (Purple): Third highest priority level.
Normal Priority: This is the default priority level and has no color designation when selected.
Low Priority: Postings will have no color designation but will display with 'Low Priority' in front of the job title in black font to indicate this posting should be worked on as time allows, all other orders should take precedent over this posting.
Select if you wish for this posting to be set for automatic refills. Automatic Refills tied to a posting will force the system to create an exact mirror of this posting whenever anyone that was originally tied to it is closed out of the system. The automatic refill feature of the system is particularly helpful for those clients that experience peak times in their business in which they always must maintain a certain headcount in a particular area, job title, etc.
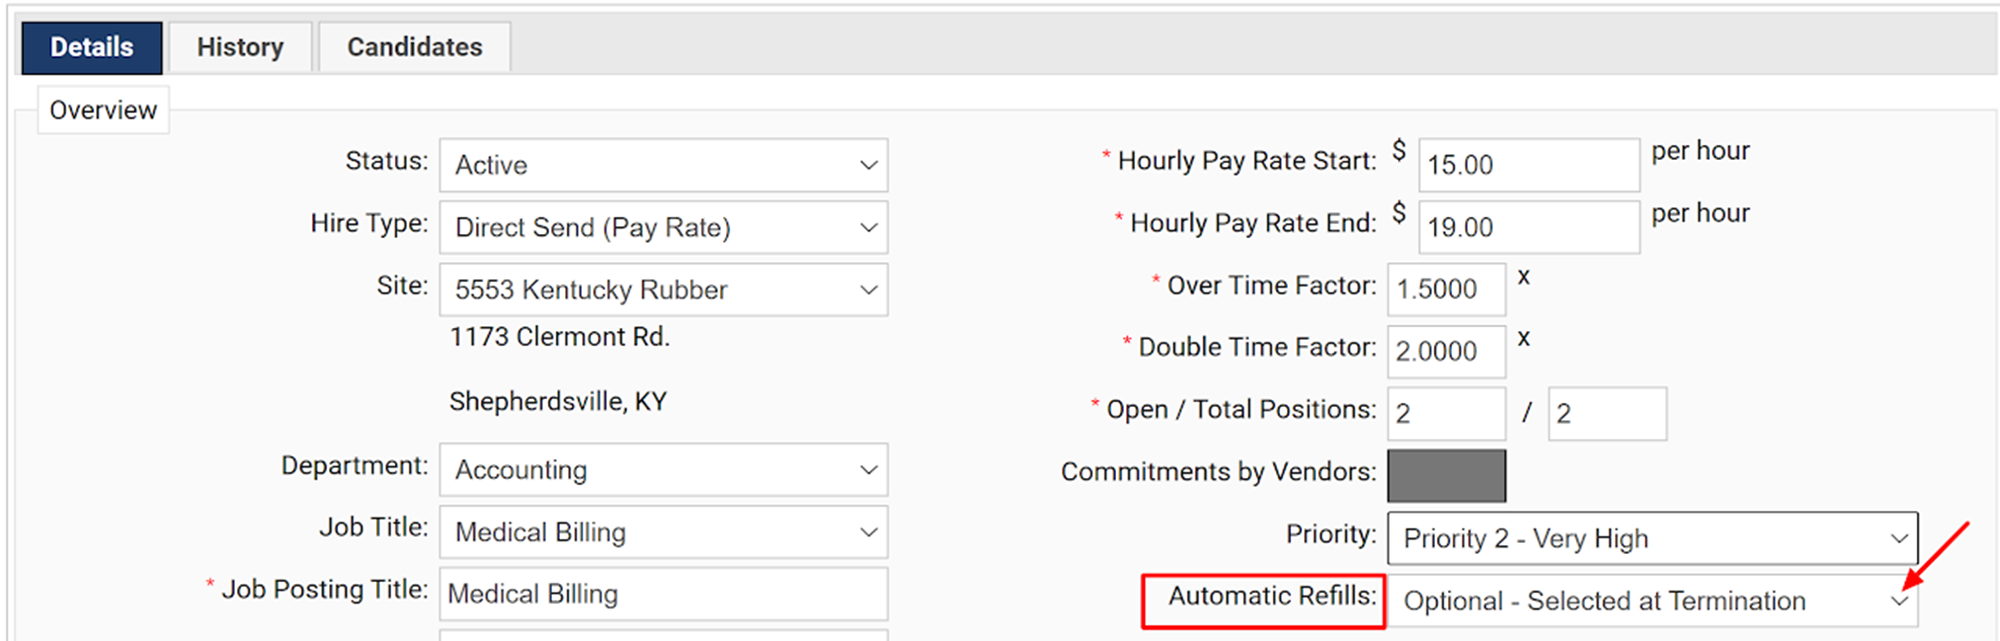
Job postings default to have refill orders as optional. This allows the need for a refill to be determined at time you are closing out an associate within the tool. However in total there are 4 different refill options:
-
Always Refill - All Vendors: When selected, whenever a worker tied to this order is closed the system will create an exact mirror of the order the worker was originally assigned to and send it to all vendors that support your account.
-
Always Refill - Same Vendor: This option will create a refill order and send it ONLY to the vendor that placed the worker you are closing out, your other vendors will not be notified of the refill posting.
-
Optional - Selected at Termination: This option is the default status job postings are set to, this will allow you to choose at time of closing whether you want a refill order to be created.
-
Refills Disabled: When this option is selected refills are turned off. Should you need a refill order you will need to create a new job posting.
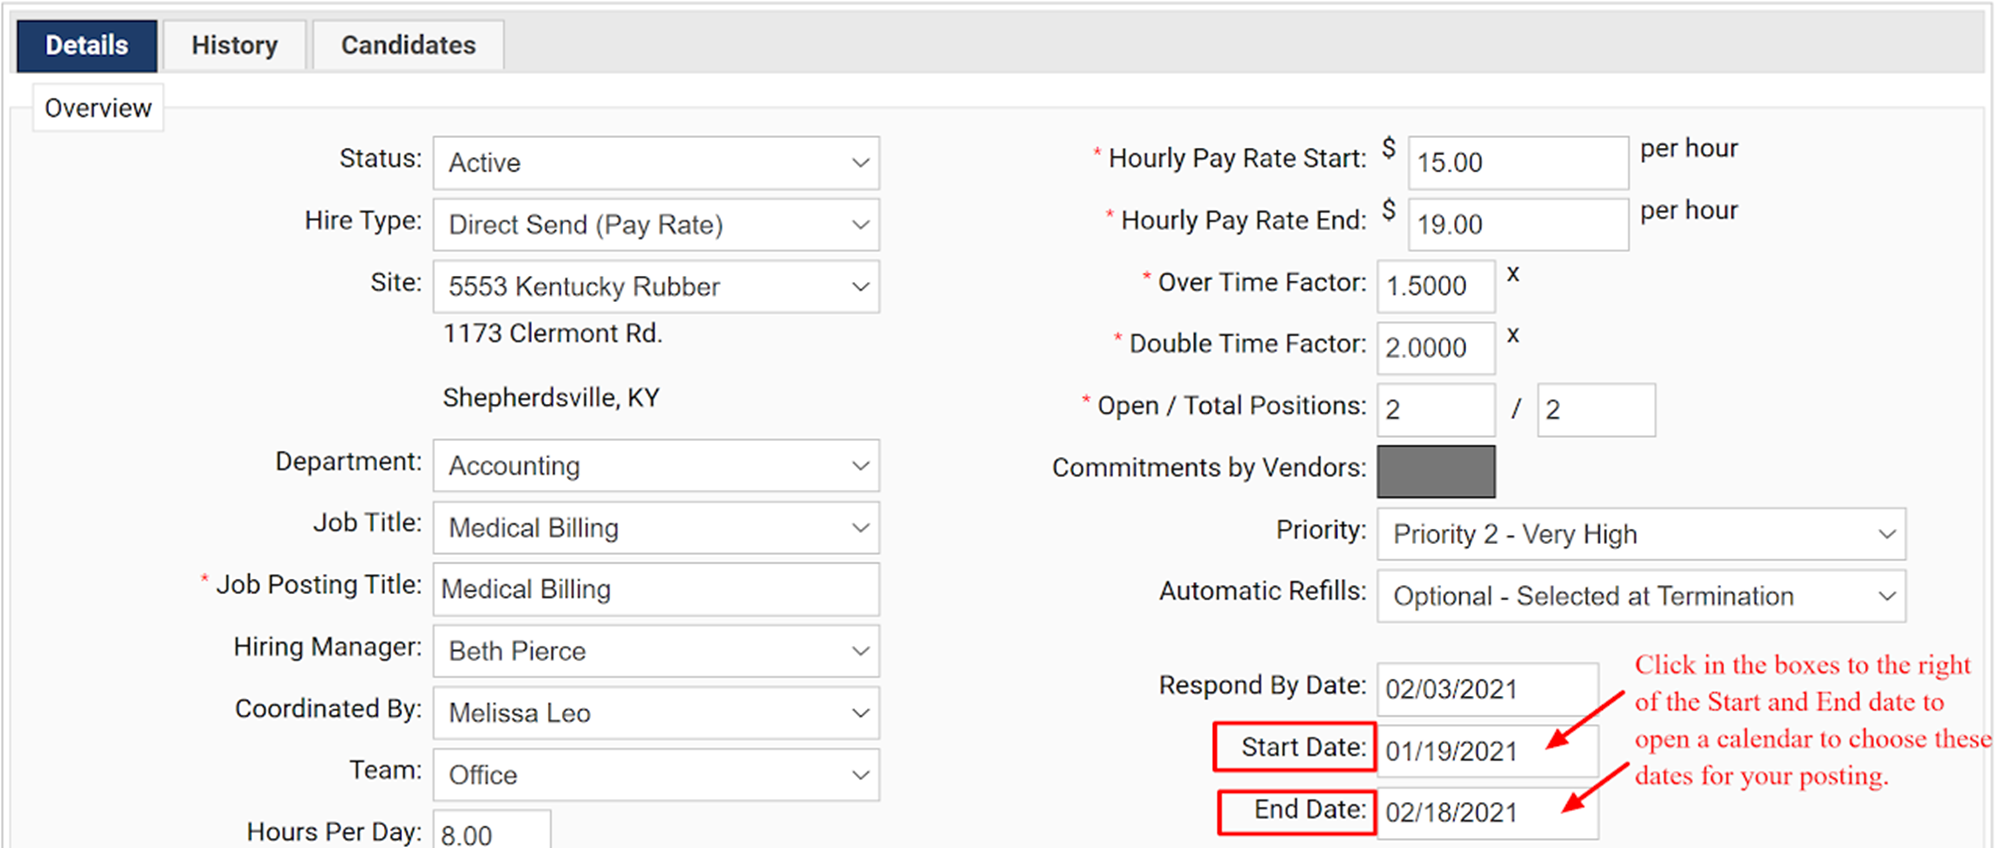
Select your 'Start Date' and 'End Date' for this posting.
Start Date: Indicates the day you wish the associate(s) to start the assignment.
End Date: Indicates the date the assignment is expected to end. Vendors are trained that if they see an end date right around 1 month from the start date to consider this an open ended assignment. Associates will never be closed out of the system when the assignment end date comes and goes. Workers will need to be manually closed out.
Job Posting Requirements will preload based on the information tied to the job title template as well as the details set in place for your organization as a whole. Any requirements set for the entire organization can only be changed to a higher tier, they can never be changed to less than what is set or removed.

As you continue to scroll down on the job posting you will see the:
-
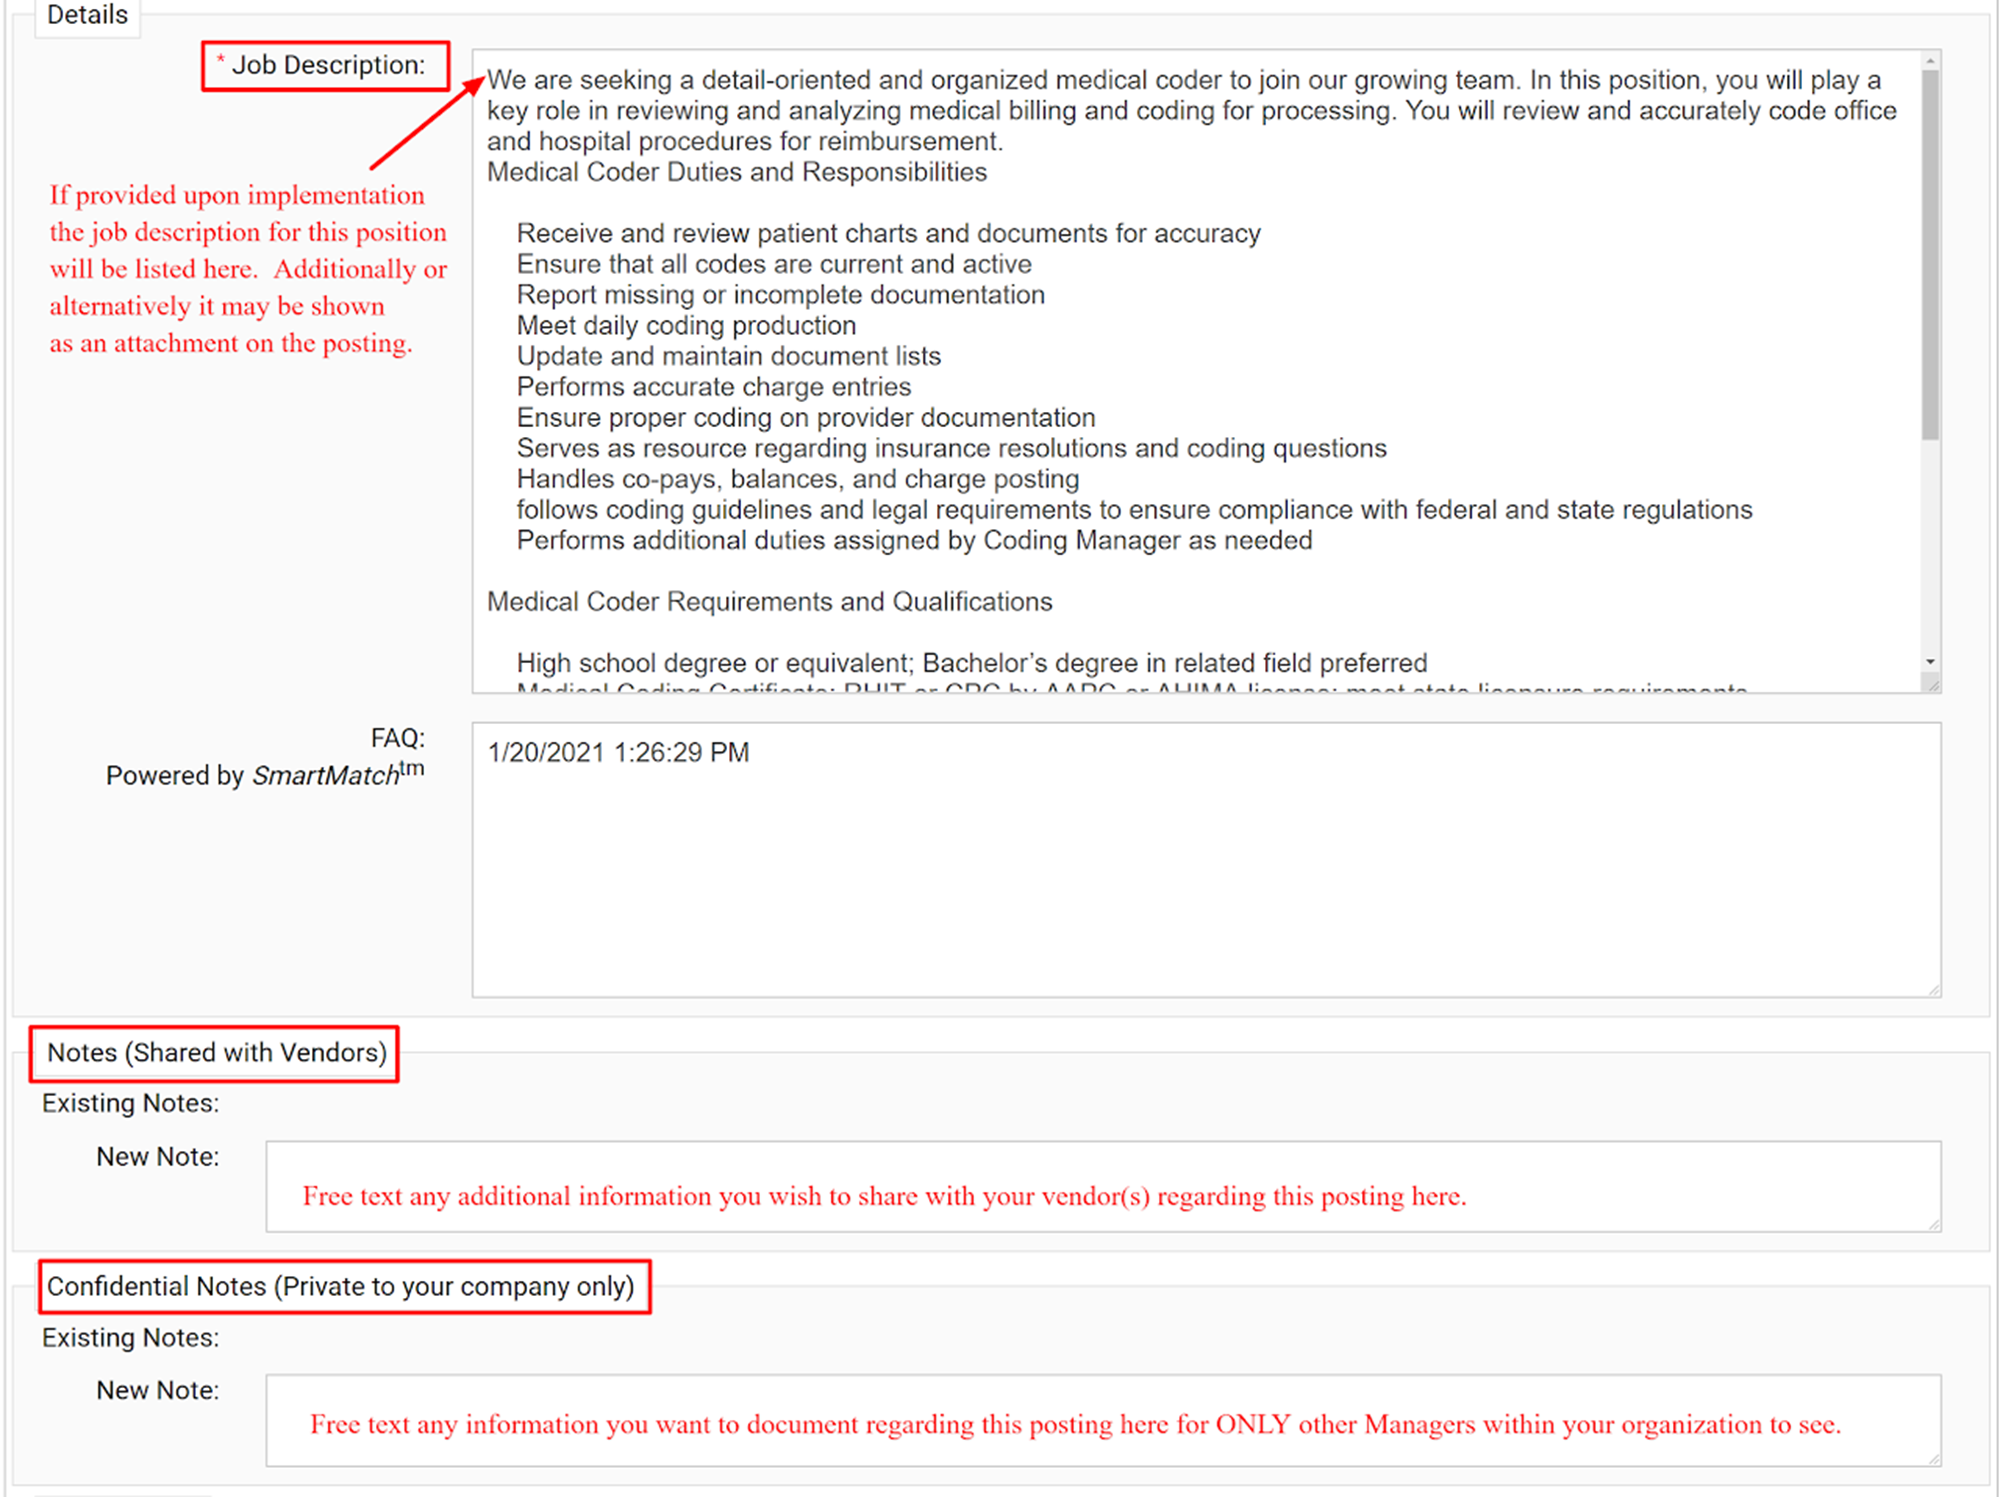
Job Description: If one was provided, the job description will populate based via the information associated with the job title template created for this role.
-
Notes (Shared with Vendors): Document anything here that you wish your vendor(s) to know or be communicate to anyone they assign to this order. When this order is placed your vendors will be able to see this information as they view the details of the job posting.
-
Confidential Notes (Private to your company only): Document any information here regarding this posting. Only Managers that have access to this posting within SimpleVMS will be able to view this information. Anything entered here will not be sent out to anyone, it is strictly for documentation purposes.
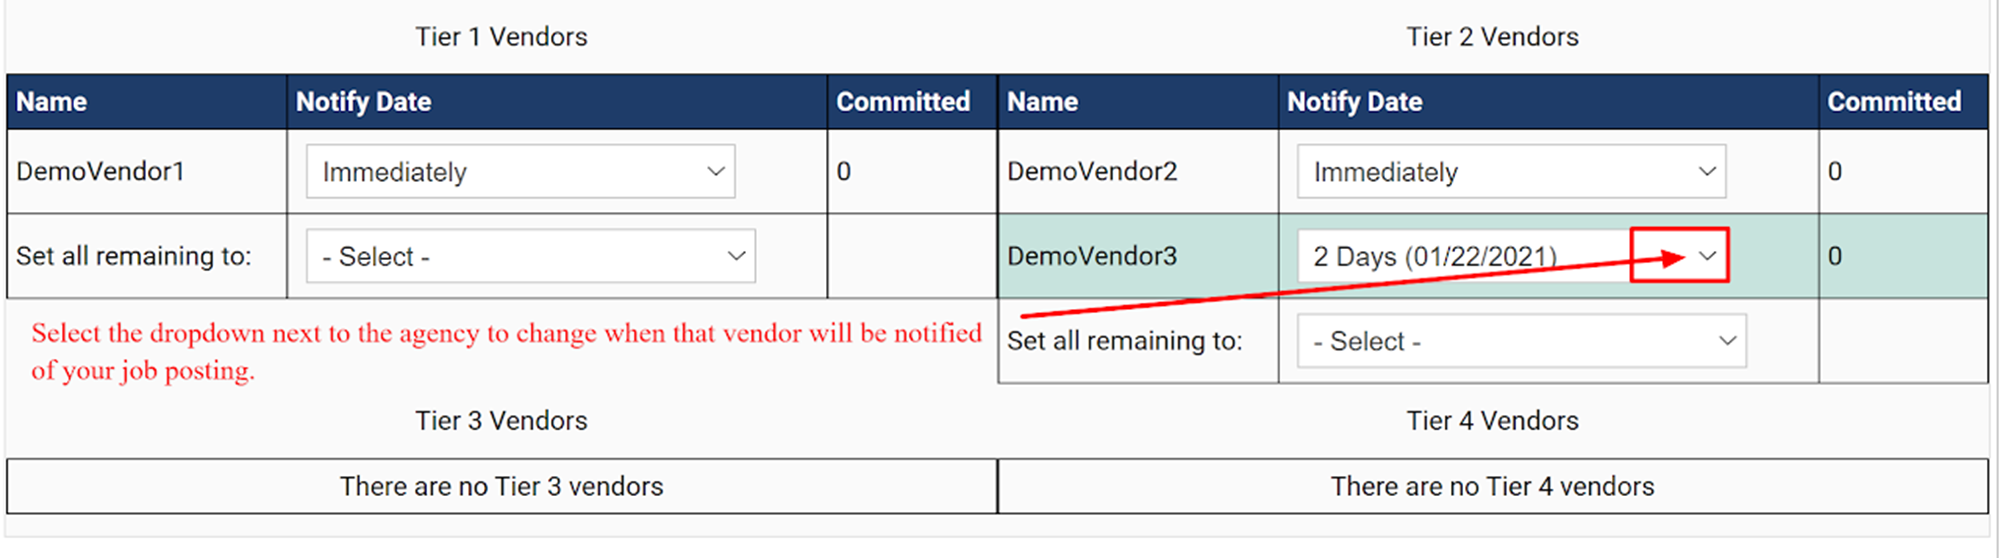
You will want to select the vendor(s) that you wish to work on this order. SimpleVMS offers 4 different tiers for your vendors to be placed within. Based on these tiers we can set different time frames in which those vendors are notified of your job posting. You are, of course, able to bypass these and select when you'd like each vendor to be notified to overwrite the defaults set.
NOTE: If your organization has any approval processes in place you will only see an option to select who to send the posting to for approval or just an option to 'Add Job Posting' and the system will default and send the posting approvals to the appropriate parties within your company.
Select 'Add Job Posting'. Once selected in real time the vendor(s) that you have elected to be notified of the posting will receive a communication from SimpleVMS regarding the order and start recruiting for your role.

Below is a quick video link that will walk you through this entire process: