Invoices
The Invoices tab will display a list of system generated invoices that we have submitted to the client on your behalf. It is here you can see the status of each invoice, Submitted, Approved, Received, Paid.
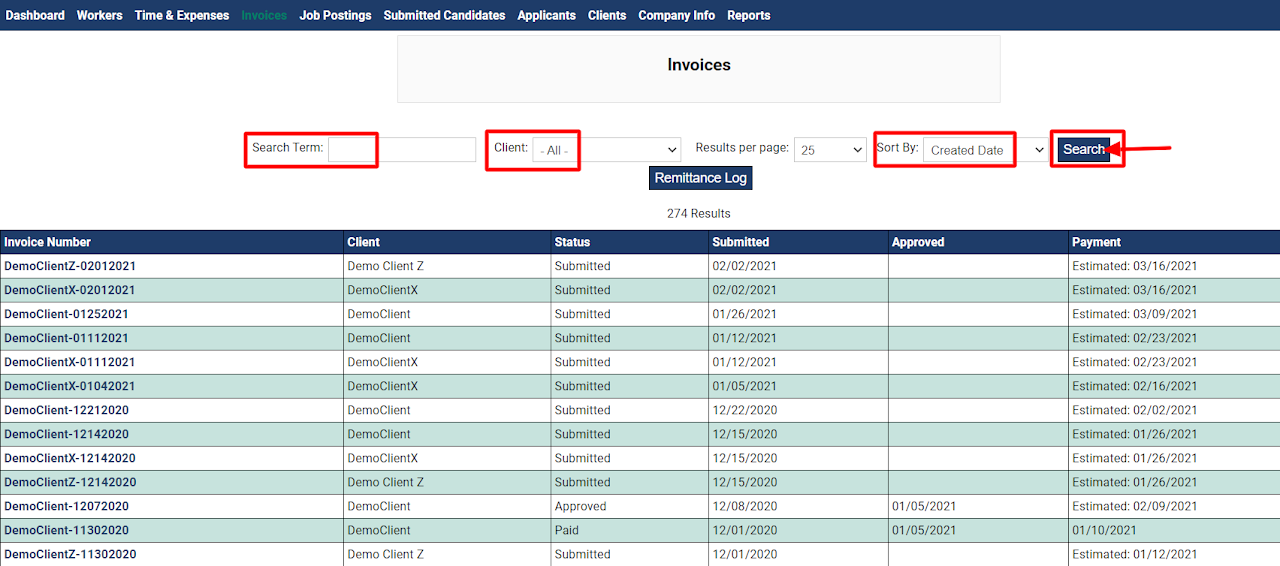
From the invoices tab you can view the most up-to-date statuses of your invoices. By default you'll see all invoices for all clients displayed as most recent invoice first, client the invoice is associated with, invoice status, submitted and approved date (note, invoices do not need to be approved), and the estimated payment date or payment date.
Please note if you see an estimated date in the payment column this is derived from the net terms the client has set, 5 days for SVMS accounting to process payment, and a 7 day float. NOTE: This is ONLY an estimate, invoices are paid out to vendors within 5 business days of receiving payment from the client.
You can narrow the invoices tab to view the invoices you wish to see by client, status, etc.
-
Client: From this dropdown you can select the client you wish to view invoice for only on this page.
-
Sort By: Use this dropdown menu to sort the invoice page by various dates, invoice numbers, etc.
-
Search Term: If you want to enter any additional information to further narrow your search enter that here and then select, 'Search'.
Invoice Statuses:
SimpleVMS invoices are numbered by the client name, then client site (if applicable), followed by the Monday's date after the week that's being invoiced has ended, followed by net terms (if applicable). Client names and sites may be abbreviated to shorten the invoice number.
Example: DemoClient-02012021N30
Client Name DemoClient - 02012021 (Monday's date after the week that's being invoiced has ended) - N30 (Net terms, if applicable).
There are 5 different invoice statuses in SimpleVMS:
-
Submitted: Invoice has been sent to client for review.
-
Approved: Invoice has been approved by the client and has likely been sent, via their internal process, for payment to be made. NOTE: an invoice does not have to be approved in SimpleVMS for the client to have started processing payment. Each client uses this tab per their individual workflow, as a result it is possible for an invoice to go from a submitted status to a received status.
-
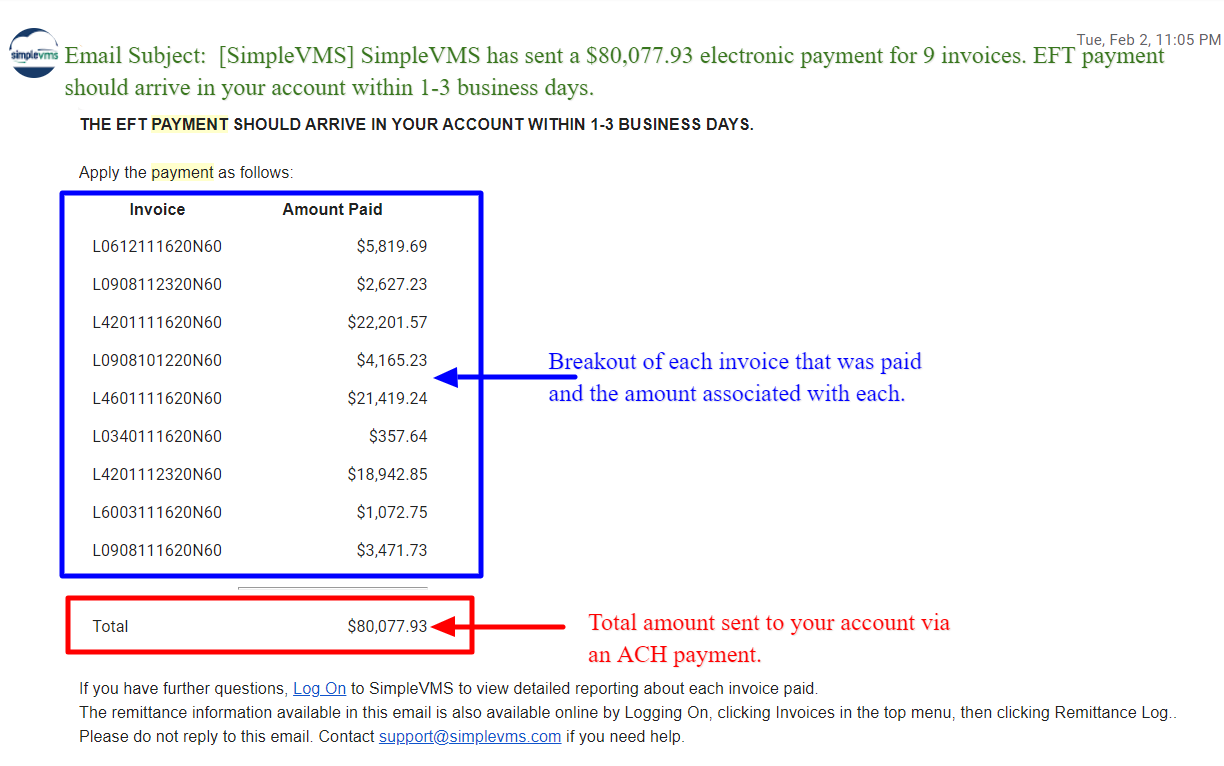
Received: Payment on the invoice has been received by SimpleVMS. Once deposited funds are available in our account an ACH payment will be sent and you will be notified via a 'Payment Notification' email from our noreply@simplevms.com account. Below is an example of this communication.
-
Paid: Invoice has been paid, if you have not already received these funds in your account you should expect them within 2-3 days of the paid date.
-
Rejected: Client has rejected this invoice, if we can correct the issue and resubmit we will. If an invoice is rejected in SimpleVMS the system does require a note to be added as to the reason for the rejection. If you select the rejected invoice you will be able to view this note. Generally, invoices rejected are reverted and an expense is issued on the following invoice to adjust for whatever issue may have occurred.
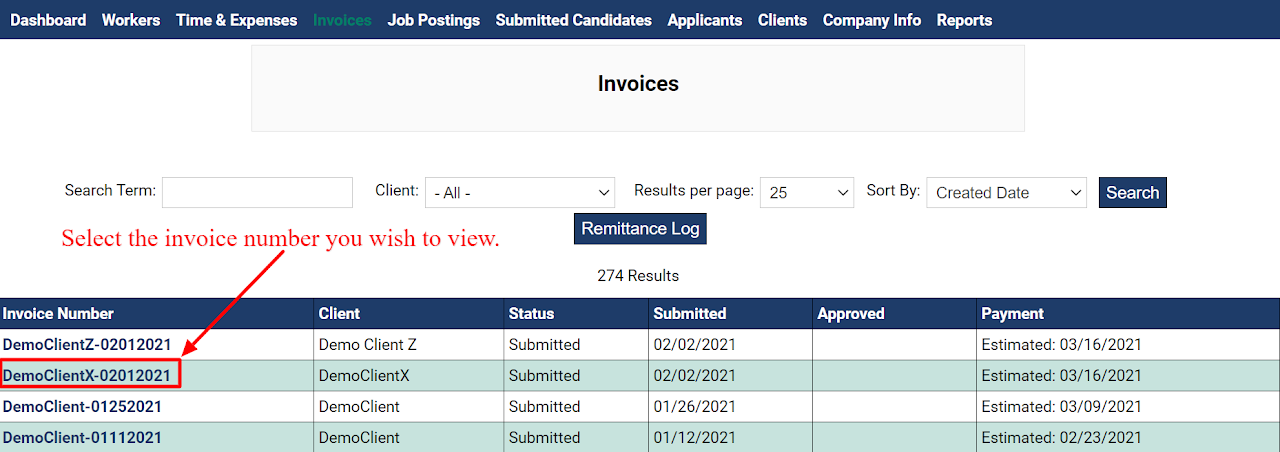
Invoice Details: To see the details of an invoice, from the invoice tab, select the invoice number you wish to view.
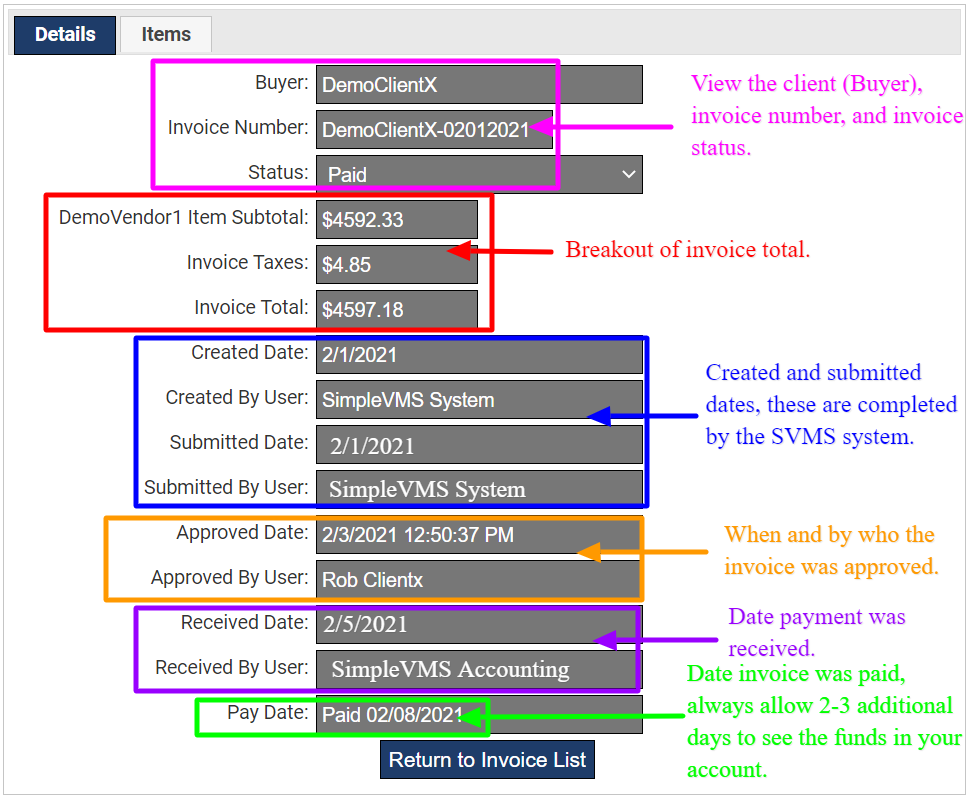
The details tab within the invoice will display:
Buyer/Invoice Number/Status: View the client (buyer) this invoice is associated with, the invoice number, and the status of the invoice.
Invoice Total: View the invoice subtotal, taxes, and invoice total.
Created and Submitted Dates: Invoices are created and sent to clients via SimpleVMS automation. View the dates as to when this occurred for the invoice you selected.
Approval Date: View when and by who approved the invoice. NOTE: an invoice does not have to be approved in SimpleVMS for the client to have started processing payment. Each client uses this tab per their individual workflow, as a result it is possible for an invoice to go from a submitted status to a received status.
Received Date: This is the date that SimpleVMS received the funds for the invoice. Our agreement with each vendor outlines there are 5 business days from receipt of payment as to when it is paid out. Generally our accounting team processes payment in just 2 days but 5 is what is contractually set. This time allows the check to clear our account and for the invoice payment be broken out across all vendors that should be paid.
Pay Date: This is the date the invoice was paid via an ACH payment. Please allow up to 2-3 days to see this funds reflect in your account, this time can vary based on your financial institution.
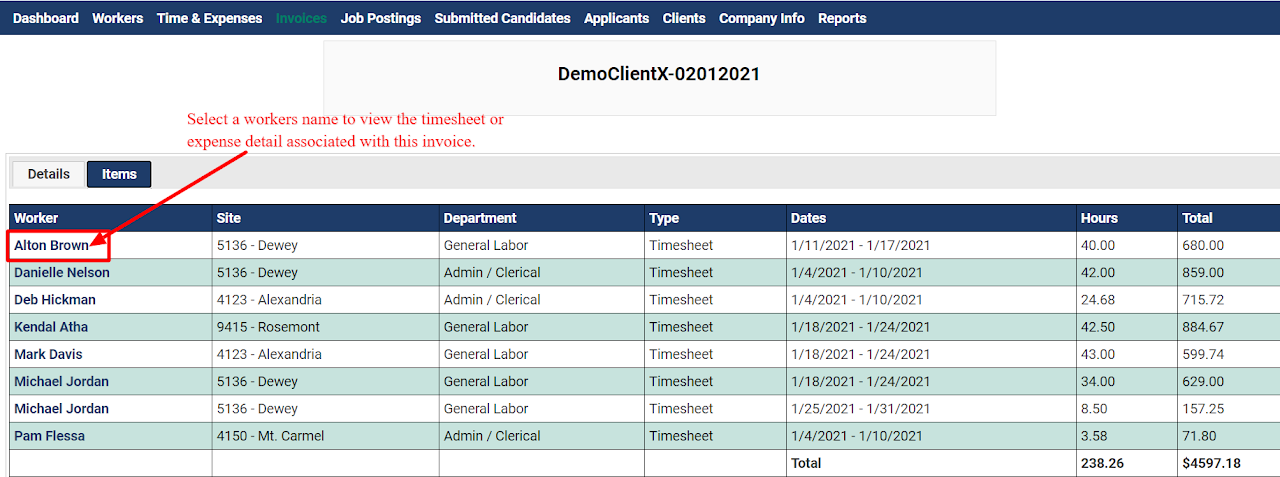
Invoice Items: The items tab of the invoice will outline each worker that is on the invoice, the site and department the worker is associated with, whether what is being invoiced is a timesheet or expense, date range of timesheet or expense, total hours (if applicable), and total spend.
You can select a workers name to view additional details around the timesheet or expense on the invoice for that worker.
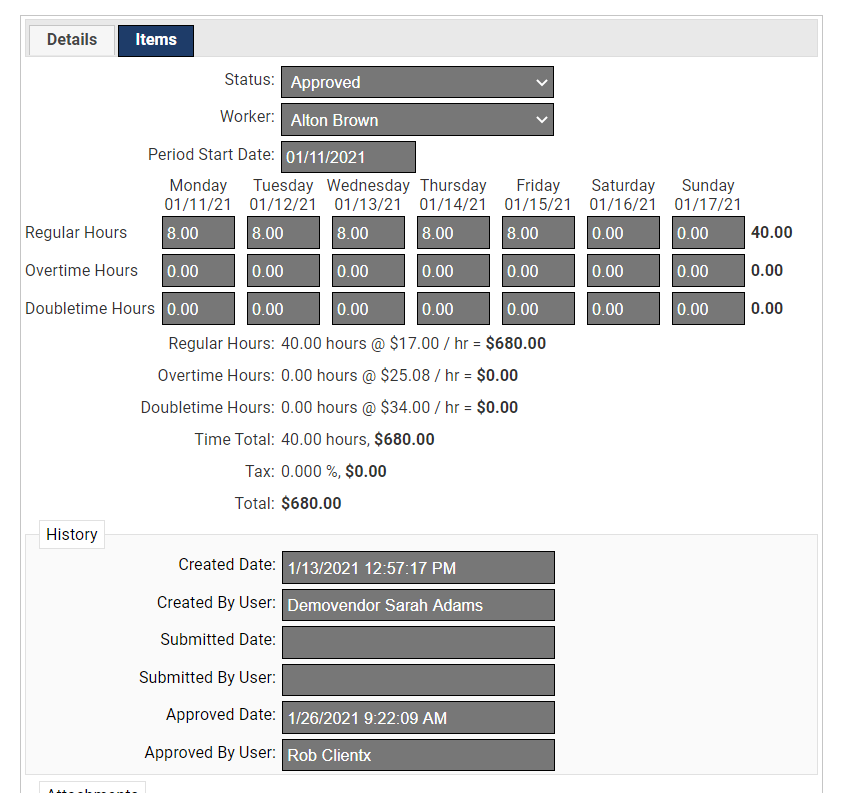
When you select the workers name their invoiced timesheet or expense will populate. From here you can view the breakout of hours, rate, etc. if a timesheet or the expense description, amount, etc. if an expense. You can also quickly view who created and approved the timesheet or expense and when. Below is an example of the invoiced timesheet view from this tab.
Remittance Log: At the top of the Invoice page is a 'Remittance Log' button.

When selected you'll see a listing of dates in which your agency received a payment from SimpleVMS, the number of invoices paid, and the amount paid.
Select a date to open up the details of this payment.
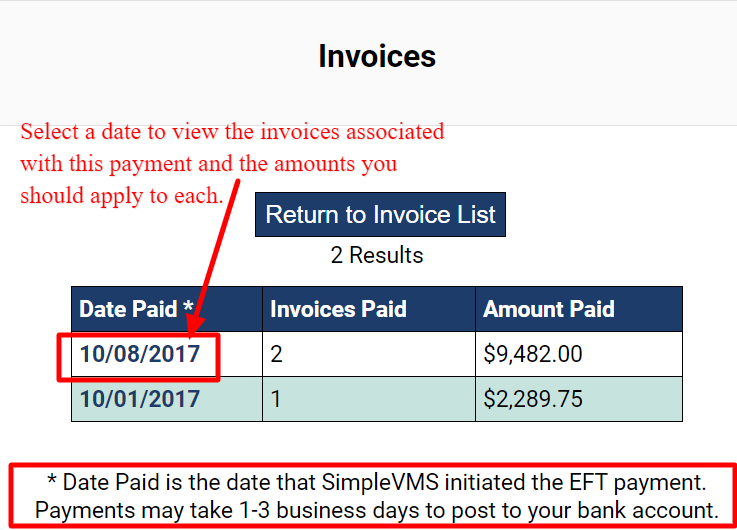
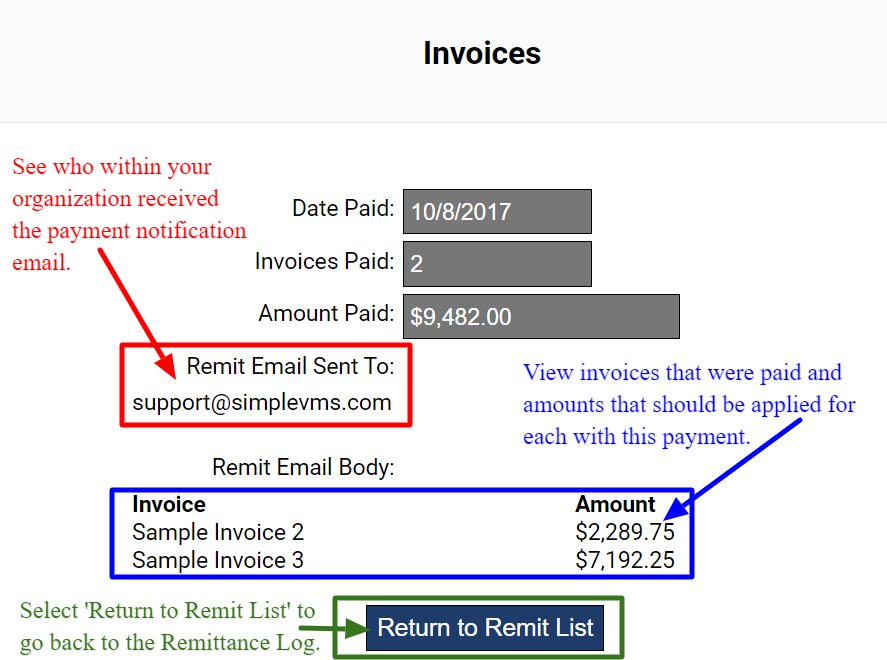
Selecting the date will showcase:
-
Who within your organization received the payment notification that was sent regarding this payment.
-
The invoice number(s) and amount associated each that were processed with this payment.
-
Select 'Return to Remit List' to go back to the Remittance Log.
Adding additional contacts to the payment notification emails:
If you'd like to add or remove email addresses for your organization regarding who receives payment notifications you can do so by going to the 'Company Info' tab within the system. Within the company info tab, select the 'Contact Information' tab.
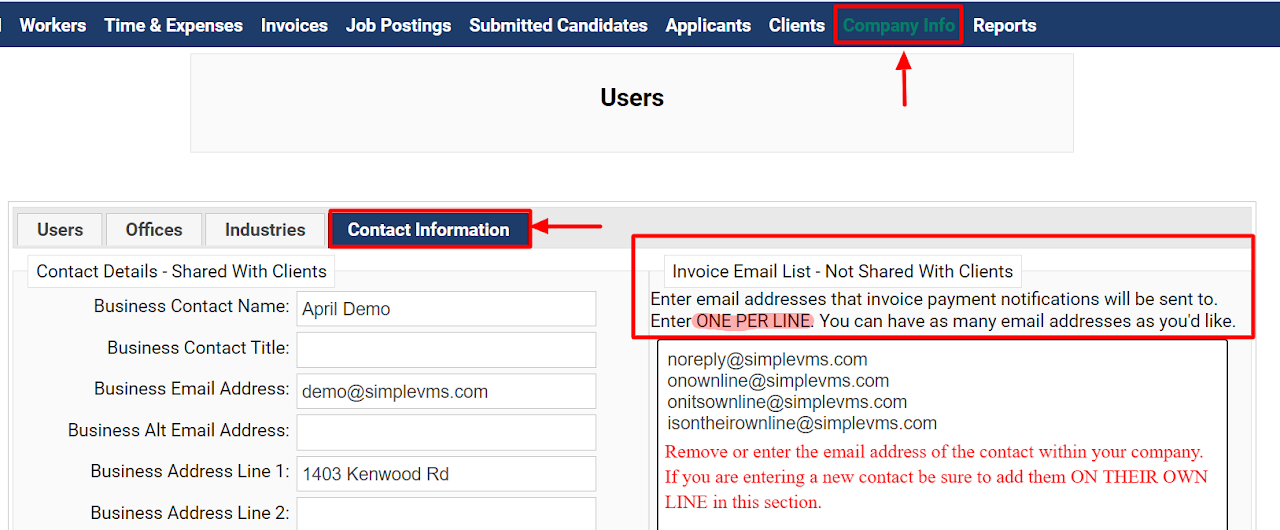
Be sure to scroll to the bottom of the page to 'Save Contact Info'.

